
Forget everything you knew about how to create a custom default setting for your raw photos, and let’s get up to speed on the new system. Once you install the 9.2 update your old custom default settings will not work on newly imported photos or when you click the Reset button. This will not affect previously imported photos (unless you click the Reset button). If you’ve never created a custom default for raw photos, then you won’t notice anything different in this regard, but now you’ll know how to use this feature in the future. Note, this also sets the raw default for the Adobe Camera Raw plug-in (and if you set it there, it becomes the default in Lightroom Classic).
What is the Raw Default?
When you import raw photos into Lightroom Classic some settings must be applied to the raw data to serve as a starting point for your edits. The un-customized settings are called the Adobe Defaults, which applies the Adobe Color camera profile, zeros out almost all other settings, and applies a baseline configuration of sharpening and noise reduction in the Detail panel. Note, this only affects raw photos, so you won’t see any changes to JPG, PSD, PNG, or TIF files (which do not have any settings at all applied to them by default).
There’s nothing wrong with the Adobe Default settings, and there is nothing wrong with keeping them as-is. However, if you find that you always end up applying the same settings to all new raw photos (like lens correction or a specific camera profile or different sharpening settings), then you might benefit from customizing the defaults to include your preferred settings. All this does is give you a new, and customized, starting point for your raw photos.
Where is the Raw Default Set?
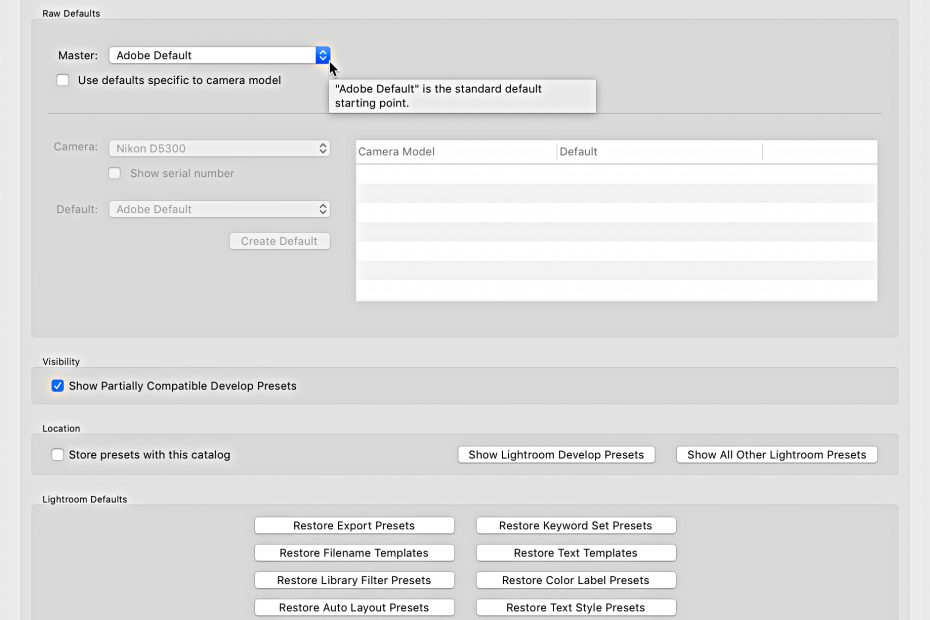
The new system is found under Lightroom Classic > Preferences > Presets (PC: Edit > Preferences > Presets). Here you will find an entirely new panel called Raw Defaults. The old method for customizing default settings has been removed.
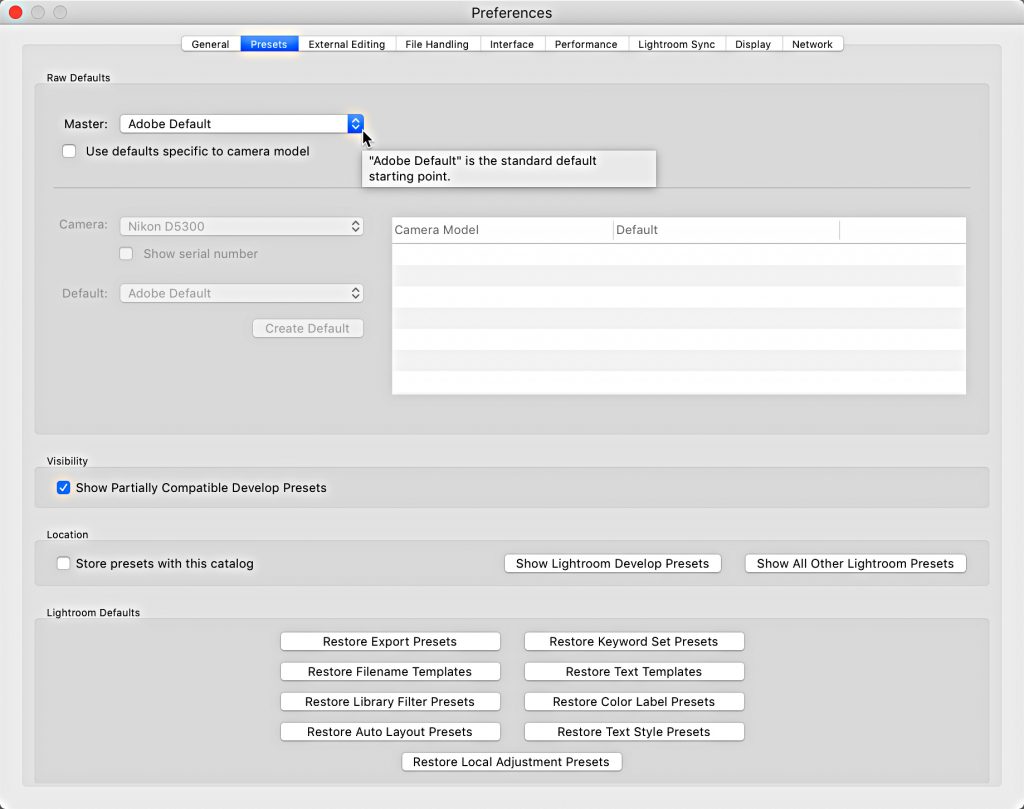
Within the Raw Defaults panel you have three basic options for the Master control:
Adobe Default: The same Adobe defaults as we’ve had in the past. Adobe Color is the default profile, and most settings are zeroed out (with the exception of the sliders in the Detail panel).
Camera Settings: The same as Adobe Default except that a profile will be selected to match your in-camera picture style selection (instead of Adobe Color). So, if you set your camera to shoot in B&W (monochrome), choosing Camera Settings would honor that and you will see that a monochrome profile has been applied. Note, unless you shoot with one of the Nikon Z series cameras, it just selects a matching profile and does not change any other settings. Nikon Z series owners may also see other settings in Basic and Detail panels change based on in-camera settings (hopefully we’ll see this extend to other camera makes and models in the future). This is an exciting new development, and I hope we see this idea of Lightroom Classic doing a better job of emulating the in-camera settings continue to evolve.
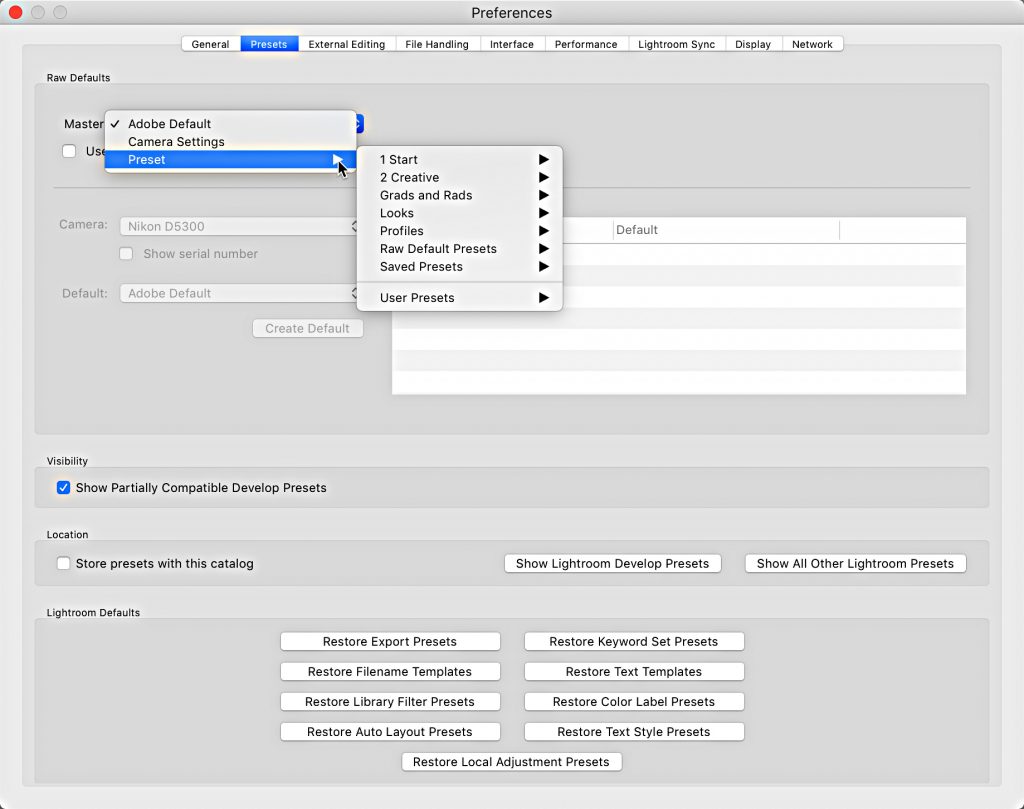
Preset: You choose a Develop preset that will be applied by default to all raw photos from all cameras (or just specific camera models). This will basically take the place of the old custom camera raw default option. You can include anything that you are able to include in a preset. You can also combine this with the Camera Settings option above.
Set the Master Default
If you only have a single camera or you want all raw photos from all camera models to have the same base default settings, then customizing the Master setting is the first thing to do. In the old system we needed to create a custom default individually for all cameras even if we wanted to apply the same settings, so this is another improvement over the old system. Let’s imagine a few scenarios to help make sense of this.
Scenario One: You don’t want to change anything at all. In this case, leave it set to Adobe Default.
Scenario Two: You want to experiment with letting Lightroom Classic change the profile for all raw photos based on the in-camera picture style you choose, but leave all other settings the same as Adobe Default. In this case, choose Camera Settings from the Master drop-down menu.
Scenario Three: You have a preset that you always apply on import, and you want to make that preset the new default for all raw photos, or you want to create a preset for this purpose and make that preset the raw default. In this case, you would use the Preset option in the Master drop-down menu to navigate to and select the desired preset.
Create a Preset
Let’s create a preset that simply enables the Auto settings function and leaves everything else at the Adobe Default, but also includes the new Camera Settings function for choosing a profile based on in-camera picture style. This is just an example, so feel free to include only the settings that make sense to your workflow.
Step One: Select a raw photo and click the Reset button to ensure it is at the Adobe Default settings with everything zeroed out.
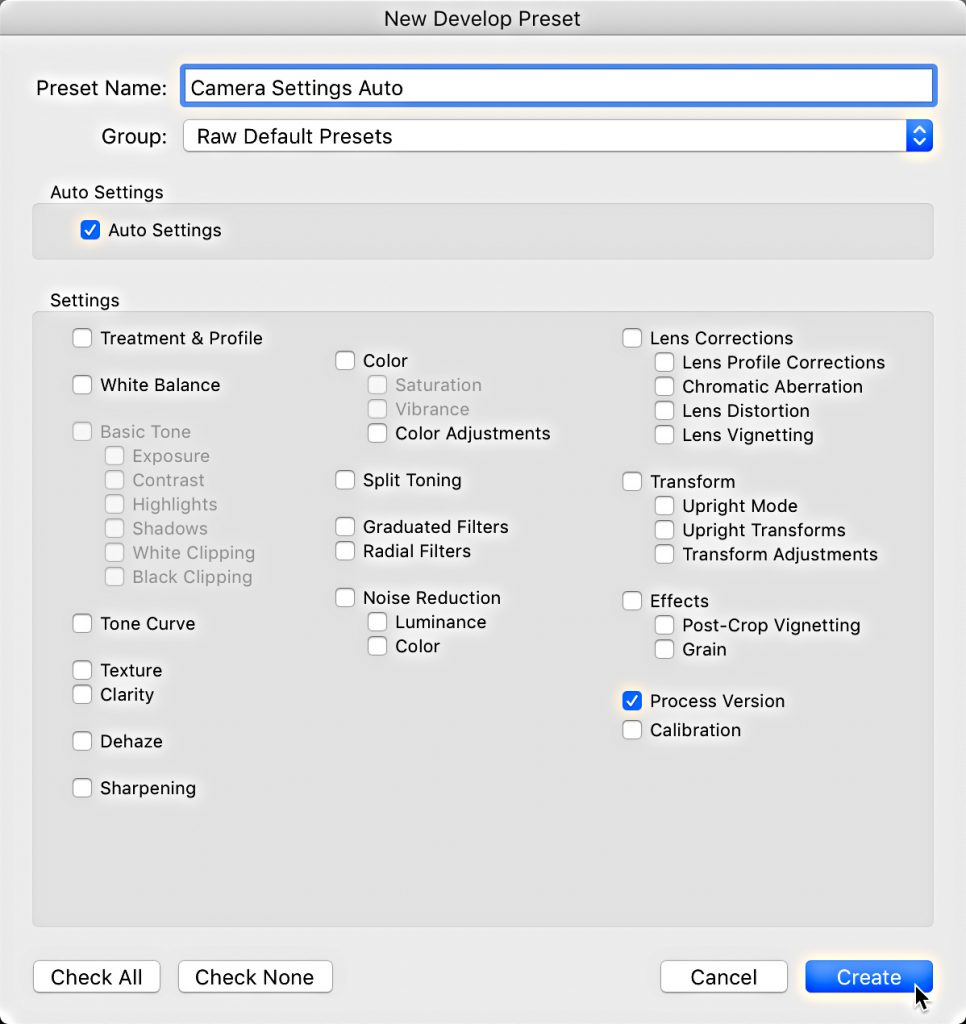
Step Two: Go to Develop > New Preset to open the New Develop Preset dialog box. Name this preset Camera Settings Auto (or whatever makes sense to you).
Step Three: Click the Group drop-down menu and create a new group called Raw Default Presets (or whatever makes sense to you).
Step Four: Click the Check None box, and then only check the boxes for Auto Settings and Process Version. By not checking the box for Treatment & Profile Lightroom Classic uses the previously mentioned Camera Settings function for choosing the profile (and if you are shooting with a Nikon Z series, possibly some additional settings). Then click Create to complete the process. The new preset will appear in the Preset panel within the group you designated.
Step Five: Go to the Presets tab of the Preferences, and click the Master drop-down menu, go to Preset, and select to the preset you created under the Presets menu (look for the preset group you designated). You should then see the name of your preset loaded in the Master drop-down menu.
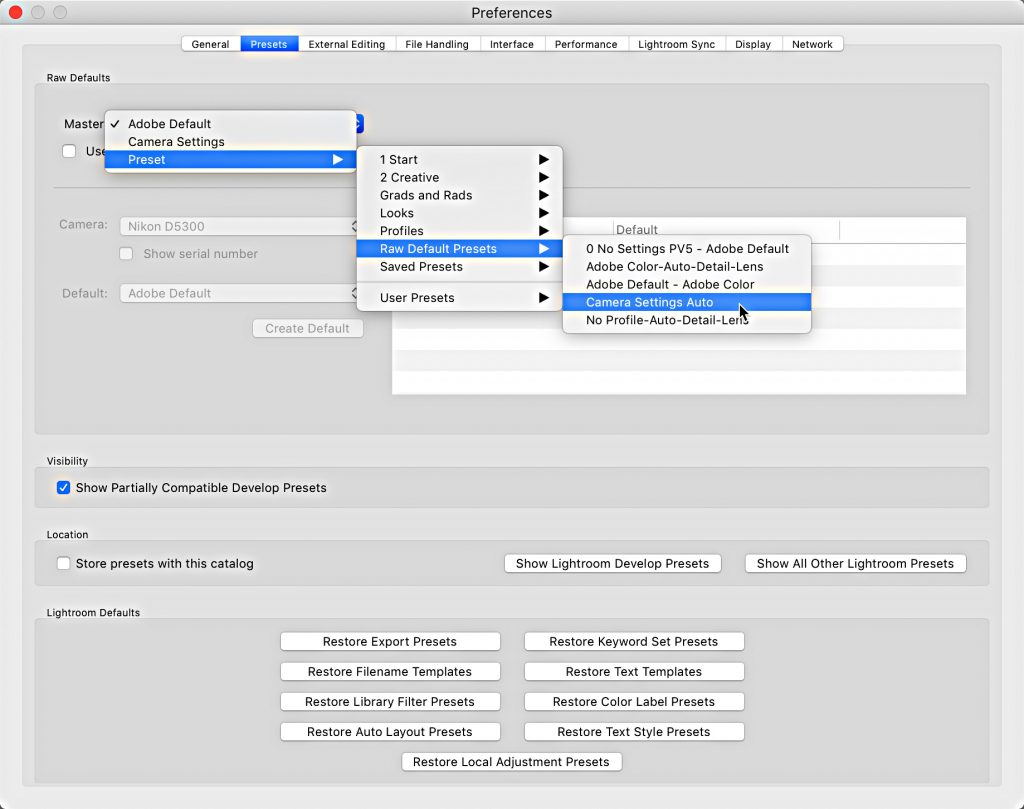
From this point forward, all newly imported raw photos will have the settings included in the preset applied to them by default. Likewise, clicking the Reset button in Develop will reset to the new default settings. Take some test photos with different in-camera picture styles applied, and then import them and give your new defaults a test drive.
Updating The Preset
After doing some testing you decide that you want to stick with the Camera Settings option for choosing profiles, but you don’t want to have Auto Settings applied AND you want to include a lens profile correction. Let’s update that preset.
Step One: With a raw photo selected, click Reset to set to defaults. Then go to the Lens Corrections panel and check the boxes for Remove Chromatic Aberration and Enable Profile Corrections. Leave everything else at the default.
Step Two: Right-click the Camera Settings Auto preset we created earlier (or whatever you named it), and choose Update with Current Settings to open the Update Develop Preset dialog box.
Step Three: Only check boxes for Lens Profile Corrections, Chromatic Aberration, and Process Version. Leave every other box unchecked. Click Update.
Go ahead and click the Reset button and the selected photo should retain the profile that matches the in-camera picture style, the tonal value sliders in the Basic panel should reset from Auto, and the boxes in the Lens Corrections panel should be checked. To update your default settings in the future, just update that preset. Note, be careful not to delete that preset or your defaults will revert to the Camera Settings option without telling you.
Make Defaults Specific to Each Camera
Now that you have a Master setting you like, what if you want to have a different default setting for one or more cameras you shoot with? In that case you’ll want to check the Use defaults specific to camera model checkbox under the Master drop-down menu. Once enabled, it brings the bottom section of the new panel to life.
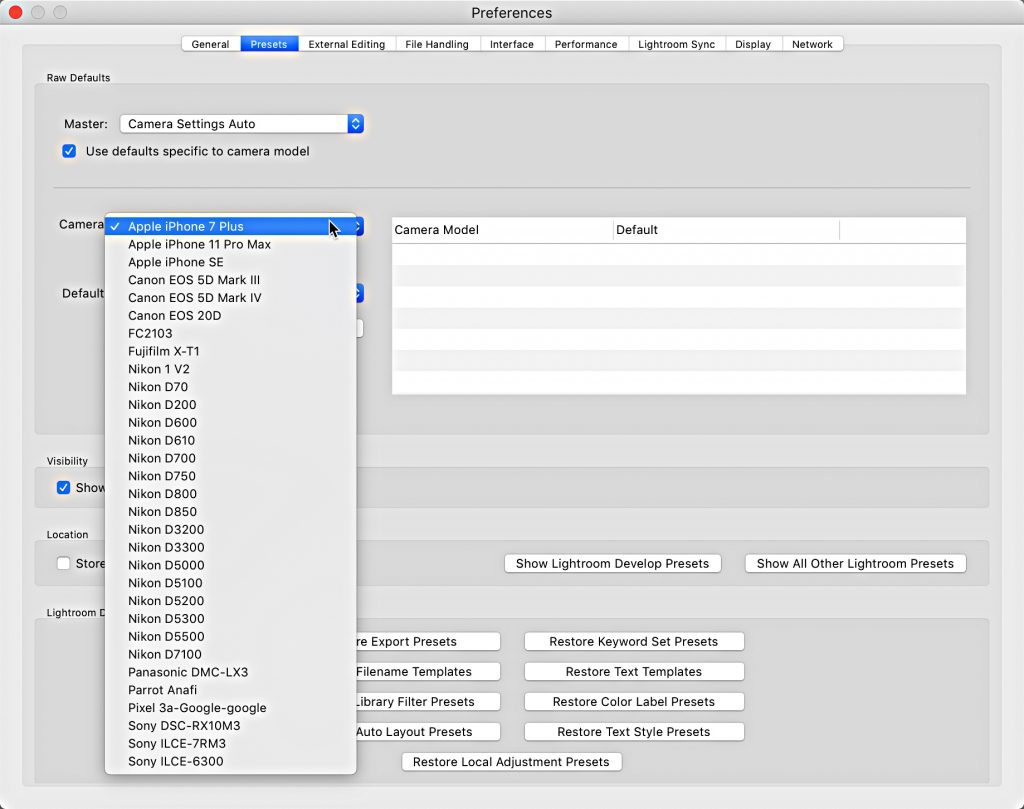
Using the Camera drop-down menu you can select the camera model you want to create a custom default setting for, then use the Default drop-down menu below that to choose from the same three options I outlined above, but for that specific camera only. Note, if at first you don’t see the desired camera model listed, exit the Preferences and view a folder or collection containing photos from the desired camera and return to this Preference setting. Once configured as desired, click the Update Default button to add that configuration to the panel. Note, if you need to set your defaults based on camera body serial number, check the Show serial number box and you’ll be able to choose each camera body individually.
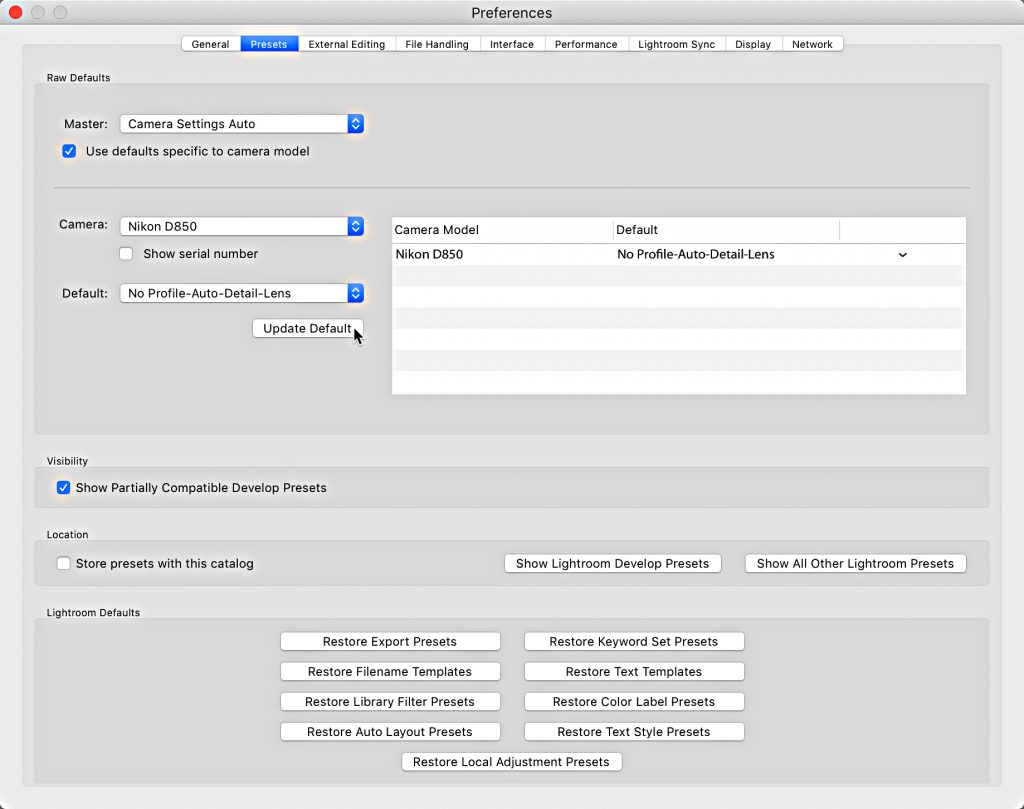
Once you’ve applied a camera specific default you can modify, update, or delete that setting via the drop-down menu at the far-right of the panel. Under that menu you will see options for choosing Adobe Default, Camera Settings, accessing all of your develop presets, or deleting that camera specific default setting.

In Closing
You can of course still continue to apply a preset during import or when tethering or using Auto Import. The Raw Default setting you choose is applied first, then any import preset is applied on top of the default, and then anything you apply manually after import comes next. Think of the Raw Default as a time saving measure to get you to your preferred starting point. Think of import presets as creative or job specific additions to your default settings to get you to a different starting point. If all of this seems too overwhelming at first, just leave it at Adobe Defaults and do all your editing in Develop manually. There’s no wrong answer, just a few options to consider.
In the old method it was also possible to create a custom default based on ISO settings. That option has been removed from the interface. However, Adobe has documented an alternative method that involves editing a preset XMP file in a text editor to add in the ability to customize settings based on each photo’s ISO. This is decidedly more advanced, and not for everyone. Hopefully that aspect of this process will evolve to become more user-friendly.
One final note, the old shortcut for resetting to the Adobe defaults (useful if you had a custom default setting using the old method) has been discontinued in this latest update. So pressing Command + Shift + R (PC: Ctrl + Shift + R) does the same as just pressing Reset, which is to reset the photo based on the settings you’ve chosen in the Raw Defaults section of the preferences. If you want a way to get to all zeroed settings and the Adobe Color profile, then you’ll want to create a preset that does that, and just click the preset when/if needed.